If sticky residue is crusting around your washing machine’s detergent drawer, start here: stop any running cycle, then find your model’s manual before you touch anything. Some drawers slide all the way out for a warm-water wash; others are fixed in place and should only be wiped. Pulling, prying, or soaking the wrong design can crack trim or warp plastic. The rest of this guide shows how to identify your type and clean only what the manufacturer permits.
Front-load laundry machines look broadly similar from the outside, which is exactly why appearance is a poor guide to maintenance. The look of the cabinet, the shape of the front controls, or the position of the dispenser face does not establish how your detergent drawer releases, or whether it releases at all. Two machines that look nearly identical can use completely different mechanisms, so resist the urge to copy what seems to work on another unit and confirm the details for your specific model instead.
Why residue collects in the drawer
Detergent, fabric softener, and other laundry additives can leave residue behind in the dispenser as you use them. That is a normal consequence of running these products through the drawer, not automatically a sign that something has failed. It is one reason LG recommends cleaning the detergent dispenser regularly on its washers. What a visible crust or sticky film cannot do is tell you its cause. Seeing residue does not establish whether it is mineral scale, whether it is mold, or whether there is a mechanical fault behind it. Those are separate questions that often need the manual or a technician to answer, so this guide stays focused on removing residue you can safely reach and clearly flagging when to stop.
Removable drawer or fixed dispenser? Confirm your model first
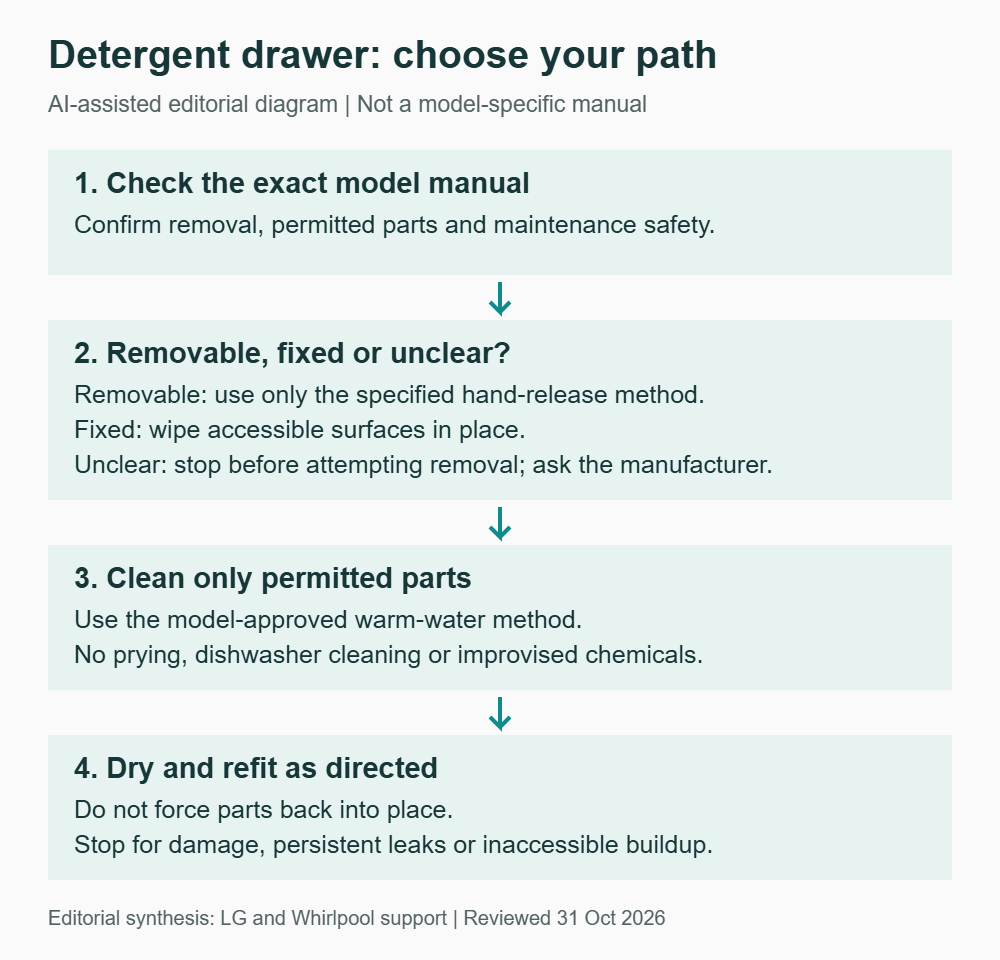
This is the single most important fork in the whole process, and the two manufacturers whose instructions are linked at the end of this article describe it differently, which is exactly why there is no universal “pop it out and soak it” rule.
On many LG front-load washers, the detergent dispenser is meant to be cleaned at least monthly. LG’s instructions describe pulling the dispenser drawer out until it stops, then depressing a tab located between the bleach and softener compartments while you continue pulling to release it fully. Permitted inserts can then be taken apart where the design allows. That is a removable design with a specific release sequence.
Whirlpool, by contrast, is explicit that on some machines the dispensers and surrounding trim are fixed and not removable. For those, the guidance is to wipe them with a damp cloth and dry with a towel rather than trying to take anything out. Only if your particular model has a removable drawer do you remove it using the method documented for that model. On the removable design Whirlpool illustrates, that means pressing two tabs downward to release the drawer. Notice that LG’s single tab between two compartments and Whirlpool’s two downward tabs are different mechanisms for different machines, which is the whole point: follow the manual that came with your washer, not a video for a different brand.
AI-assisted editorial decision table
The table below is an AI-assisted editorial decision aid to help you route yourself to the right path. It is an editorial summary, not manufacturer source evidence, and it does not replace your own manual. When the table and your manual disagree, the manual wins.
| What your manual says about the drawer | What you may do | Where to stop |
|---|---|---|
| Drawer is removable, with a described release (for example an LG tab between compartments, or Whirlpool’s two downward tabs) | Remove it using that exact method and hand-wash the permitted parts in warm water | Stop if the release does not work with gentle hand pressure; do not force or pry |
| Dispenser and trim are documented as fixed and not removable | Wipe with a damp cloth and dry with a towel in place | Do not try to pull, pop, or lever it out |
| Manual is missing or unclear about removal | Treat it as fixed: wipe only, then look up the manual before doing more | Do not guess the release mechanism |
| Residue is deep inside channels you cannot reach by hand | Note it and contact the manufacturer | Do not insert tools, hoses, or high-pressure spray |
What you actually need
Keep the supply list short and ordinary. For the compartments you are allowed to clean, warm water does most of the work:
- Warm water (warm, not boiling)
- A soft-bristled brush, such as an old toothbrush, which LG suggests for scrubbing the dispenser
- A damp cloth and a dry towel, which is the whole kit for a fixed dispenser
- Optional: a small amount of mild detergent, but only on a documented removable drawer when your exact manual permits it (Whirlpool, for example, references washing a confirmed removable drawer in warm soapy water). Do not add soap as a default if your manual calls for water alone.
Deliberately not on this list: bleach, vinegar, descaling solutions, or any mixed chemical soak. Some manufacturers mention bleach or vinegar for other parts of the machine, such as the door gasket or the water inlet, but those instructions are written for those specific parts and should not be borrowed into the detergent drawer. Never combine cleaning chemicals, and do not pour a universal soaking solution into the drawer on a timer you found somewhere else.
Preparation and safety before you touch the drawer
Set the machine up safely first. End or cancel any running cycle so water is not being pumped through the dispenser while you work. Then follow your manual’s exact instructions for isolating power before maintenance. Do not drag a heavy machine out from the wall and do not reach behind it to grab a wet plug; if the manual calls for unplugging, do it the way the manual describes, with dry hands and clear access.
A few hard limits apply no matter which design you have. Use no tools to pry the drawer. Do not pull on internal hoses, remove panels, or disconnect anything that is not plainly part of the described cleaning. Use warm water rather than boiling, which can soften or distort plastic. And if you notice water sitting in the dispenser area, the amount of water on its own does not establish that something has failed; check your exact manual rather than acting on a general rule.
Cleaning the parts your manual allows
For a removable drawer, pull it out to its stop, then release it using your model’s method and lift it away. Separate any inserts that are meant to come apart. Wash the parts by hand in warm water, using the soft-bristled brush to work residue out of the corners and channels. Keep it to warm water and the brush unless your exact manual permits more: on a documented removable drawer, Whirlpool references warm soapy water with a mild detergent, so use mild soap only if your own manual allows it for your model and not as a universal step. Rinse every piece thoroughly so nothing is left behind, then let the parts dry before you reassemble and reinstall them.
For a fixed dispenser, the job is simpler and gentler: wipe the accessible surfaces and trim with a damp cloth to lift the residue, then dry with a towel. Do not escalate to removal just because the wiping feels slow.
One rule is identical across the brands referenced here: the drawer, tray, and inserts are not dishwasher safe. The heat of a dishwasher cycle can melt or warp them, so always hand-wash. Keep the water warm, keep the pressure gentle, and never put these plastic parts through any heated appliance.
Troubleshooting and prevention
If residue keeps coming back, review your habits and, above all, your manual’s cleaning schedule. LG, for instance, recommends cleaning the detergent dispenser at least monthly on its washers; your own manual may give a different interval, so follow the figure it states rather than a general one. Making sure powder dissolves and not overfilling liquid compartments are sensible habits, but the schedule you keep should come from your model’s documentation.
Know when the problem is no longer a cleaning job. If you see persistent leaks, cracked or damaged trim, or buildup wedged somewhere you cannot reach by hand, stop and contact the manufacturer or a qualified technician instead of escalating to harsher cleaners or improvised tools. Likewise, if product still is not dispensing after you have cleaned everything the manual allows, follow the manufacturer’s troubleshooting steps for your model next rather than trying to diagnose the cause yourself. Cleaning the drawer addresses the residue you can reach; it is not a diagnosis of why a dispenser is or is not working.
For broader routines on keeping your laundry and other appliances fresh, see our appliance cleaning guide. And if a musty smell is really what sent you to the drawer, our household odor guide covers where odors actually come from and how to track them down, since a clean-looking drawer and a lingering smell are not always the same problem.
Sources
- LG, LG Front Load Washer Maintenance (detergent dispenser cleaning: at least monthly, release tab between bleach and softener, warm water and soft-bristled brush, not dishwasher safe): LG Front Load Washer Maintenance
- Whirlpool, Not Dispensing Detergent / Dispenser Concerns, top-load washer (fixed dispensers and trim not removable, wipe and towel dry; removable drawers released by two downward tabs and washed in warm soapy water with mild detergent; not dishwasher safe): Whirlpool: Not Dispensing Detergent
Author: CleanThisWay Editorial Team. Last reviewed October 31, 2026. This article is an informational synthesis of the manufacturer instructions cited above; it does not involve hands-on testing by our team. The accompanying photograph is a licensed stock image used for general illustration of a laundry setting and does not depict a specific drawer, procedure, or test.
Photo credit: PlanetCare / Unsplash, used under the Unsplash License. Stock illustration only. Diagram and decision table: AI-assisted editorial summaries, not manufacturer instructions.